
In order to utilize the SOLIDWORKS Simulation Add-In, it is essential to have a SOLIDWORKS Premium license. This add-in, which is provided for free to SOLIDWORKS Premium users, grants access to a limited version of the Simulation feature. However, if you do not have SOLIDWORKS Premium, you can still obtain the Simulation capability by purchasing it separately, just as you would acquire a SOLIDWORKS license.
Simulation licenses are available in three different options: Standard, Professional, and Premium. Each license tier offers various features and functionalities tailored to meet the diverse needs of engineers and manufacturers. So, whether you require basic simulation capabilities or advanced analysis tools, SOLIDWORKS has a Simulation license to suit your specific requirements.
What is SOLIDWORKS Premium Simulation Add-in.
The SOLIDWORKS Simulation Add-In is a valuable tool that is provided for free to SOLIDWORKS Premium users. By utilizing this add-in, users can access a limited version of the Simulation feature. If you are interested in learning more about the Simulation packages and their capabilities, you can find additional information by visiting the SOLIDWORKS 3D CAD Simulation Software for Engineering & Manufacturing page.
To help you better understand the features available in the SOLIDWORKS Simulation Add-In and how they compare to Simulation Standard, a comprehensive comparison is provided below.
| Feature | SOLIDWORKS Premium - Simulation Add-in | SOLIDWORKS Simulation Standard |
| Ease of Use | √ | √ |
| Design Data Reuse | √ | √ |
| Static Studies | √ | √ |
| Fatigue Studies | χ | √ |
| Motion Analysis | √ | √ |
| Design Studies | √ | √ |
| FEA Modelling | √ | √ |
| Loads and Restraints | √ | √ |
| Assembly Connectivity | √ | √ |
| Results | √ | √ |
| Help and Support | √ | √ |
| Communication | √ | √ |
How do I activate the Add-in?
To activate the SOLIDWORKS Simulation Add-In, it is important to verify that Simulation has been successfully installed on your computer. To do this, follow these steps:
1. Open SOLIDWORKS and go to the "Tools" menu.
2. Select "Add-Ins" from the drop-down menu.
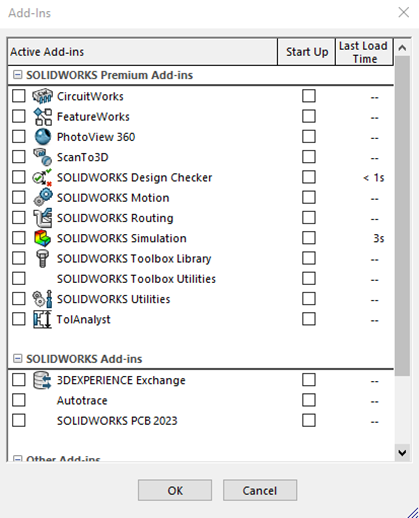
3. A window will appear displaying a list of available add-ins.
4. Look for "SOLIDWORKS Simulation" in the list.
5. If you see "SOLIDWORKS Simulation" listed, it means that Simulation has been installed on your computer and is ready to be activated.
6. Check the box next to "SOLIDWORKS Simulation" to activate the add-in.
7. Click "OK" to save the changes and close the window.
8. The SOLIDWORKS Simulation Add-In is now activated, and you can start utilizing its features and capabilities.
If you do not see the Add-in, you will need to install it. This can be done by selecting the option if it is your first time installing SOLIDWORKS on your computer, or by modifying your existing installation.
To modify your SOLIDWORKS installation, navigate to the Control Panel > Programs > Programs and Features > and make changes to your SOLIDWORKS installation. Once in the installation manager, you can select your desired options or click next until you reach the Product Selection Page.

Once you have selected SOLIDWORKS Simulation, click next and then click “Install now” or “Modify now”.
If you have installed SOLIDWORKS Simulation and have activated the Add-in, you should now have the Command Manager Tab “Simulation” as shown.

Date:07/09/2023