
Setting up Auto-Recover:
Within SOLIDWORKS, go to Options > System Options > Backup/Recover. Enable the "Auto-recover" functionality.
Within this window, you can specify the save/time increment according to your needs.

Furthermore, you can specify the auto-recover folder to be a folder which is easily accessible to you. The default folder location is: "C:\Users\UserX\AppData\Local\TempSWBackupDirectory\swxauto"
The setting can also be enabled to recover the mesh once a simulation study has finished.
Utilizing Auto-Recover:
You might think auto-recover automatically kicks in with the settings applied. This is however not the case.
You must save the part/assembly/drawing initially, thereafter the auto-recover files will be created according to the time increment specified above. The naming convention of the auto-recovered file is “AutoRecover of <part name.sldprt>.swar”. The same applies for assemblies and drawings.
SOLIDWORKS Crashed:

In the event that SOLIDWORKS crashed, you will see the following window when opening a new session:
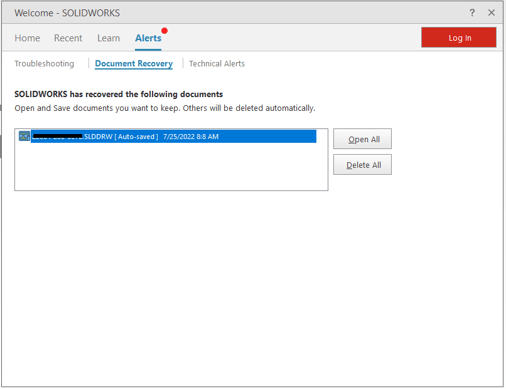
Here you can access part/assemblies/drawings that were open when SOLIDWORKS crashed. You have the option to open these files at the point where they were last "Auto-Saved". To change the name of the file “Auto-recover of <part name.sldprt>.swar”, use the "Save As" function and rename the file to the correct name.
Session Terminated:
In the case that the active session was killed by the user, the above window will not appear. In this case, it is important not to close the new SOLIDWORKS session. Open the file location for the auto-recovered files and rename the applicable file by deleting the ".swar" extension and opening the file.

Main Takeaways:
- Set auto-recovery up according to your needs.
- Save the file initially to initiate auto-recovery.
- Follow the specified steps if the session crashed and/or was terminated.
Date published: 25/07/2022